Pi2 Cluster - Docker Swarm

I am currently working on overhauling my network and devices once again, so finally (maybe) I’ll actually get around to producing a commodity cluster, this post focuses on getting docker up and running on the RaspberryPi2
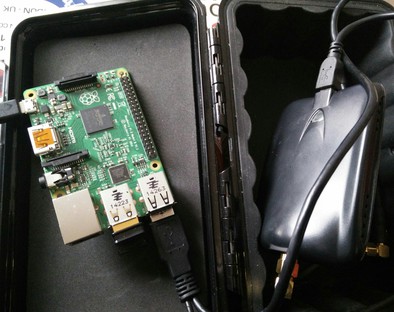
Hardware

  • 5 x RasPi2
  • 1 x Utilite Pro

Docusing on the Pi2’s here as I’ve not rebuild the utilite at this moment in time.

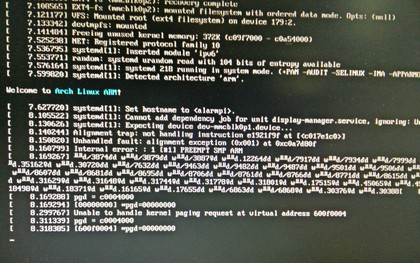
Installing Arch linux

Why are we using Arch and not raspbian? simply because of time constraints, Arch has ARM packages for docker (and openvswitch) and this will save sometime going on.

As I’ll be imaging multiple SD cards I wront a bash script to save some time

This assumes you have allready done the partitioning per the arch installation document

WARNING Make sure you do not blindly use my script, the device paths may be different and you do not want to be wiping out the wrong device.

Installing Docker

pacman -S docker

Caveats of docker on ARM

Most docker images are x86 or x86_64 so when you use docker pull and try to docker run you’re going to have a bad time …

1
2
docker run swarm
FATA[0001] Error response from daemon: Cannot start container caff048f6af28eca4648078ac1452b9464dcc16f5273a3b3d0912b1c00e0423f: [8] System error: exec format error

Running swarm without running swarm

The swarm docker images will not run on ARM, so what do we do ?

Simple we build the swarm binary from source

pacman -S golang godep

Check the github readme via the link above to get swarm to compile

Start the swarm

On one node go/bin/swarm create and record the token

Now on every node

1
go/bin/swarm --addr NNN.NNN.NNN.NNN:2375 token://the_token_from_create

Now we need to start the manager, this can be on any node or even on a sperate machine such as your laptop / desktop.

1
go/bin/swarm manage -H tcp://NNN.NNN.NNN.NNN:2376 token://the_token_from_create

Check the swarm

Again this can be run from any docker client.

1
2
3
4
5
6
7
8
9
10
11
12
13
14
15
16
17
18
19
20
21
22
23
24
25
26
27
28
29
30
docker -H tcp://XXX.XXX.XXX.230:2376 info
Containers: 1
Strategy: spread
Filters: affinity, health, constraint, port, dependency
Nodes: 5
 alarmpi: XXX.XXX.XXX.227:2375
  └ Containers: 0
  └ Reserved CPUs: 0 / 4
  └ Reserved Memory: 0 B / 970.7 MiB
  └ Labels: executiondriver=native-0.2, kernelversion=3.18.14-1-ARCH, operatingsystem=Arch Linux ARM, storagedriver=aufs
 alarmpi: XXX.XXX.XXX.229:2375
  └ Containers: 0
  └ Reserved CPUs: 0 / 4
  └ Reserved Memory: 0 B / 970.7 MiB
  └ Labels: executiondriver=native-0.2, kernelversion=3.18.14-1-ARCH, operatingsystem=Arch Linux ARM, storagedriver=aufs
 alarmpi: XXX.XXX.XXX.226:2375
  └ Containers: 0
  └ Reserved CPUs: 0 / 4
  └ Reserved Memory: 0 B / 970.7 MiB
  └ Labels: executiondriver=native-0.2, kernelversion=3.18.14-1-ARCH, operatingsystem=Arch Linux ARM, storagedriver=aufs
 alarmpi: XXX.XXX.XXX.230:2375
  └ Containers: 1
  └ Reserved CPUs: 0 / 4
  └ Reserved Memory: 0 B / 970.7 MiB
  └ Labels: executiondriver=native-0.2, kernelversion=3.18.14-1-ARCH, operatingsystem=Arch Linux ARM, storagedriver=aufs
 alarmpi: XXX.XXX.XXX.228:2375
  └ Containers: 0
  └ Reserved CPUs: 0 / 4
  └ Reserved Memory: 0 B / 970.7 MiB
  └ Labels: executiondriver=native-0.2, kernelversion=3.18.14-1-ARCH, operatingsystem=Arch Linux ARM, storagedriver=aufs

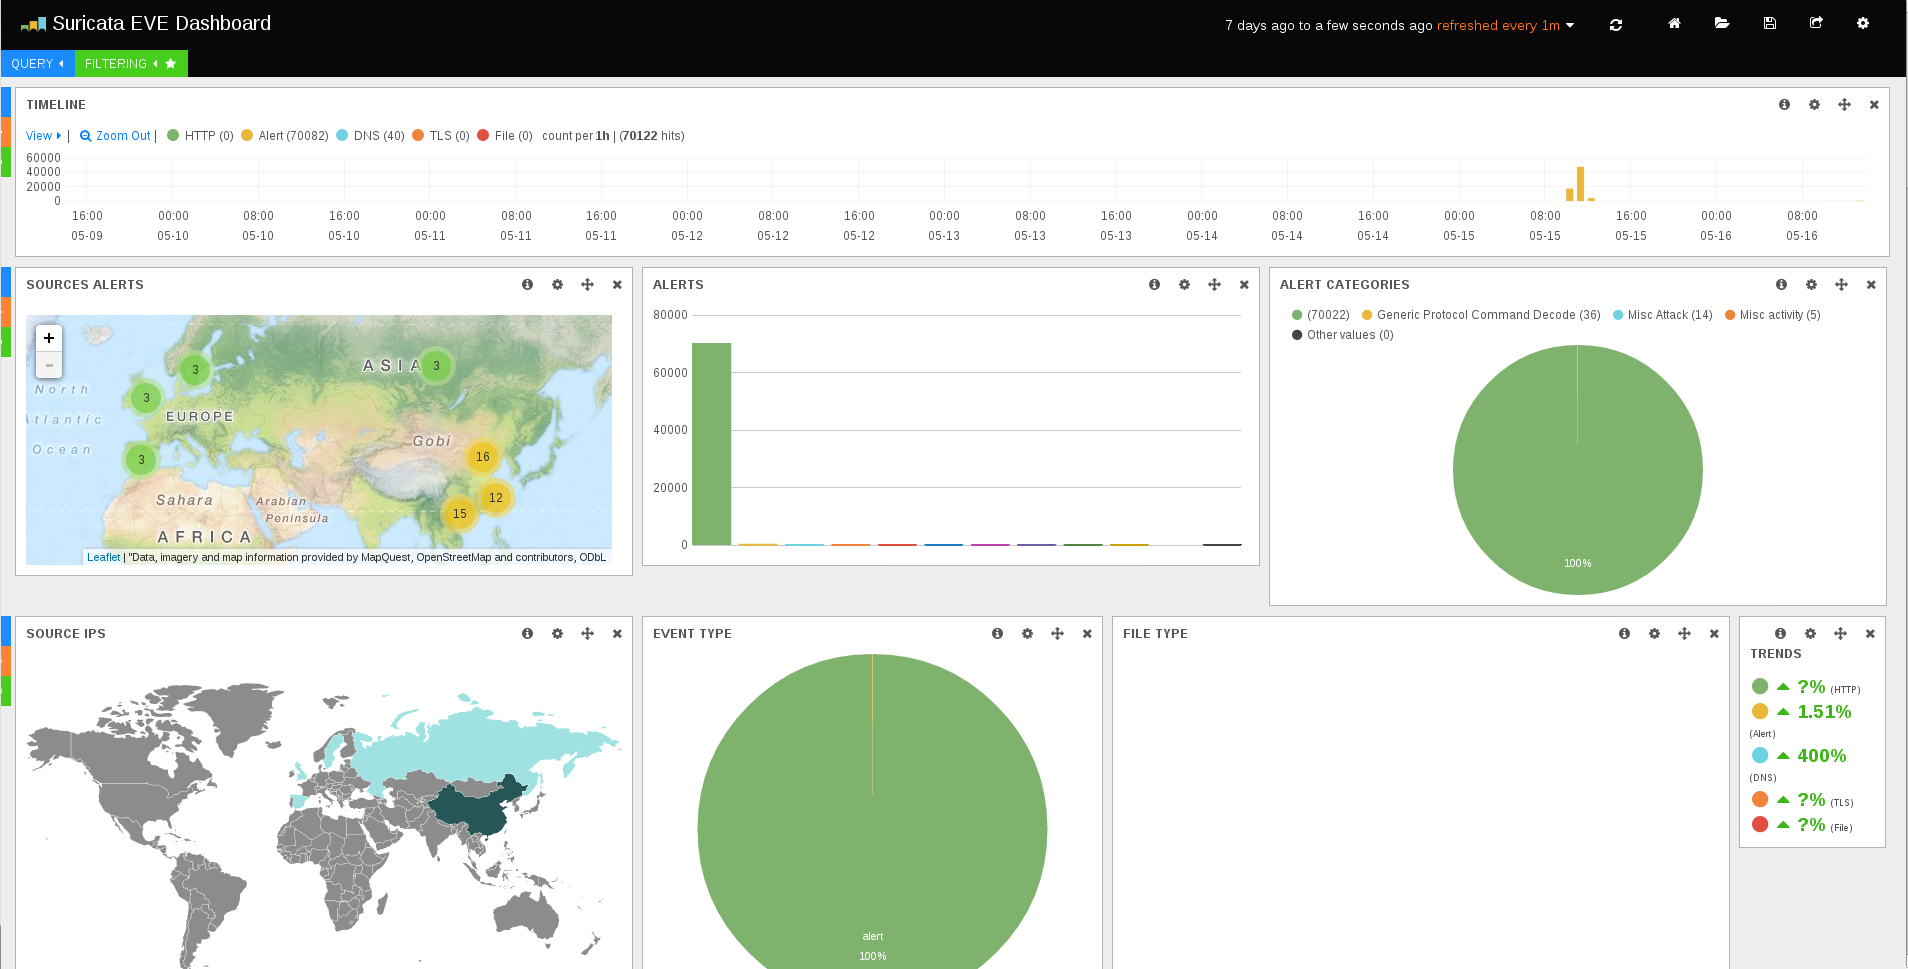
So there we have it, 20 available ARM cores all running in a docker swarm, seems simple doesn’t it? finding the correct information to make this all work however was a trial in itself.

TODO

  • Rebuild utilite-pro, make part of the docker swarm (brining the core count to 24)
  • Force docker to use TLS
  • Try to get ceph compiling (throwing issues about not finding any high precision timers)
1
common/Cycles.h:76:2: error: #error No high-precision counter available for your OS/arch
1
asm volatile ("mrc p15, 0, %0, c15, c12, 1" : "=r" (cc));
  • Write up notes on getting Logstash 1.5.0 and docker on ARM to play nice together
  • Complete setup of openvswitch
  • Explore deployment of cuckoo sandbox
  • Explore Hadoop components
  • Write up notes on distccd setup (this really speeds up compilation time)
  • Write up systemd entries for swarm (allow automatic swarm cluster startup on reboot).
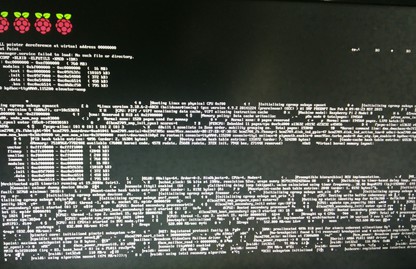
Photos

I’m uploading photos and screenshots of the cluster as progress is made here

Why Pi2?

We can’t all get our hands on a HP moonshot, I debated for some what to use, the Pi2 won out due to

  • Price
  • Form factor
  • No. cores
  • Readily available distros and packages
  • Readily available accessories (cases, etc..)
  • Low power consumption (5 pi2, 1 utilite-pro, mikrotik switch, USB thumbdrives, and USB HD’s, all runnign just under 33 watts)
  • ARM architecture

CVE-2015-1027 Percona-toolkit and Percona-xtrabackup

Since my move to information security architect at Percona back in November of 2014 I’ve been able to begin to curate and build a responsible disclosure program for which I hope best reflects that of a responsible open source vendor.

There is still penty to do here of course, and more is yet to come on this front.

The first public success story may be considered a minor one but I feel it is an important step toward responsible disclosure.

The blog post disclosure on percona.com may be found here and I’m hosting a plaintext version here

The initial research began 2014-12-16 at this time a functional PoC was created and distributed internally to allow the developers to test their fix this means from concept to fix (2015-01-16) took one calendar month, with percona-toolkit 2.2.13 being released 2015-01-26 and percona-xtrabackup 2.2.9 being released 2015-02-17.

So why you may as did the disclsure not occur untill 2015-05-06 ? simply put to allow user and distros to update; and frankly this was by far the hardest part trying to illict response from distros began to seem to a fruitless task.

And thus I had planned to just go ahead with the disclosure 2015-04-30, it was around this time we were contacted by the people over at oCERT regarding and entirely seperate issue CVE-2015-3152 for which you can read more about how this is looking to be addressed on Todd Farmer’s blog.

Following the interaction with oCERT (namely Andrea B), we’ve since applied for membership with oCERT and work continues on curating a responsible disclosure plan.

If you have any suggestions / comments on the progression of the responsible disclosure program I’d be glad to hear them via email to:

1
david {dot} busby {at} percona {dot} com

You can use either my gpg pubkey at keybase.io or 0x5422aa2ab636da5a

Please remember the program is still very much in its early stages as such time to disclosure are typically longer than exepect (as can be seen from CVE-2015-1027).

Comments

Snoopy NG on the Pi2

I’ve said it many times over in the talks I’ve given both at conferences and during meetings, the devices we carry betray a wealth of information about us without us even knowing.

Projects like Jassegar leverage this to masquerade as trusted wifi networks, and yet these issues remain.

And worse still are present in other standards beyond WiFi.

Enter Snoopy-NG, this is a suite of tools mostly authored in python which orchestrate the passive collection of the data our wireless devices are constantly screaming out into the Ether.

If you’ve ever spoken to me at a conference or on site, chances are you’ve seen my “bag of toys”; the reasons for this are for demonstration purposes.

There’s nothing I’ve found more powerful than giving a practical demonstration of an issue; be it process or security issues at fault (Please consider this the next time you raise a bug on a project’s tracker, and provide as much detail as you can screencasts are very useful).

So in this train of thought; following the announcement of RasPi2, it was time to add another tool / toy to the arsenal.

And so went the “rehashing” of some of the older tools, cases etc…

This was not without its issues however, seems if you try to draw more power than the Pi2 can provide it leads to some odd behaviour.

I took to the Raspi forums though the discussion appears to yield nothing but “you’ve got PSU problems”.

In the end the Atheros WiFi is now using a USB-Y adapter (hence the two use A cables attaching to the battery pack), as I’ve little time to waste on the debate of what a “non crappy” PSU is despite giving complete examples of all types of power supplies used in the diagnosis of the issues at hand, which appear to have been ignored.

Now running on Raspbian a git clone of Snoopy-ng was taken, depedencies installed and some modifications to /etc/rc.local to have snoopy-ng run at startup, and we’ve got a fully functional “drone unit”, though currently reliant on the old “blinken lights” to produce confidence in the running of Snoopy (the WiFi LED will blink in approx 30 second intervals whilst in monitor mode).

Currently this has had some 24hrs of stable data collection, with the only interuptions to uptime being the change between wall socket and battery power when moving around.

I would really be intrested in seeing a USB battery pack which can also take a “trickle charge” to aid in mobility, sort of a mini UPS if you will.

What’s next? maybe the USB Armory which looks quiet promissing; I’m also looking to add BadUSB, HackRF to the “bag of toys”.

I’ve also been looking at SDR on and off, particuarly instrested in the POCSAG Pager network which seems to be another clear text protocol, aswell as 802.15.4 (Xbee / Zigbee) which appears to be making itself into traffic controll systems and is again completely open.

Why you may ask would these things make it into the “bag of toys”?

I reffer back to my previous point of practical examples, unless you can demonstrably show people why something is insecure / broken they have little interest / time / money in fixing the issue at hand, if you want results far better to show someone the problem and work with them on the fix.

A.K.A. Providing a Proof of Concept

Suricata Logstash Kibana Utilite Pro ARM

I’m currently in the process of overhauling my pesonal work network, this includes deployment of an inline IPS as part of the project.

Hardware List

  • Freescale i.MX6 quad-core Cortex-A9 @ 1.2GHz
  • 2GB DDR3 @ 1066 Mhz
  • 32Gb mSata
  • 1 x SanDisk Ultra 64GB Class 10 MicroSD
  • 2 x 1GB NIC (Intel Corporation I211 Gigabit Network Connection)
  • 1 x Internal Wifi 802.11b/g/n
  • 1 x USB Alfa AWUS036NHR

Complete Utilite Pro Spec

Ships with Ubuntu 12:04 LTS

You can of course change the OS on the Utlite pro to things such as Kali and Arch assault the caveat being if you want to install on the mSATA and not run from the sdcard you’re going to need to use the serial connection.

My USB -> Serial adapter has a male connector, the connector for the Utilite also provides a male DB9 connection … so an adapter is on order.

Topology

1
[LAN Router] --- [ Utilite Pro ] --- [ ISP Router ]

So as can be seen here I’m sitting the device inline, with the intent to have it route traffic between the LAN and WAN, as an asside I also plan to use the WiFi to provide Wireless access disbaling the ISP equipment, also to allow segmented guest access for visitors etc / captive portal, but that’s a far off from solid plan at the moment

Suricata

The packages available from the ubuntu arm repos are 1.x and I want the new 2.x builds (Archassault however took my feedback and have built the 2.x packages) so in the interim to receiving the required equipment to install Arch on arm all the prototyping will need to use the unbuntu install.

Building Suricata 2.x on ubuntu 12.04 ARM

1
2
3
wget https://www.openinfosecfoundation.org/download/suricata-2.0.tar.gz
tar -zxvf suricata-2.0.tar.gz
cd suricata-2.0

Adapting from the intructions here.

Install core requirements

1
2
3
4
apt-get -y install libpcre3 libpcre3-dbg libpcre3-dev \
build-essential autoconf automake libtool libpcap-dev libnet1-dev \
libyaml-0-2 libyaml-dev zlib1g zlib1g-dev libcap-ng-dev libcap-ng0 \
make libmagic-dev

Install IPS configuration requirements

1
apt-get -y install libnetfilter-queue-dev libnetfilter-queue1 libnfnetlink-dev libnfnetlink0i

Install logstash output format (eve.json) requirements

1
apt-get -y install libjansson-dev libjansson4

configure and build suricata

I want everything to run on the sdcard at this time as I plan to replace the OS and thus everything on the mSATA ;-)

1
2
3
mkdir -p /sdcard/suricata/{usr,etc,var}
./configure --enable-nfqueue --prefix=/sdcard/suricata/usr --sysconfdir=/sdcard/suricata/etc --localstatedir=/sdcard/suricata/var
make && make install-full

–build-info

After complete of the above your build info should look like

1
2
3
4
5
6
7
8
9
10
11
12
13
14
15
16
17
18
19
20
21
22
23
24
25
26
27
28
29
30
31
32
33
34
35
36
37
38
39
40
41
42
43
44
45
46
47
48
49
50
51
root@utilite:/sdcard/suricata/usr/bin# ./suricata --build-info
This is Suricata version 2.0 RELEASE
Features: NFQ PCAP_SET_BUFF LIBPCAP_VERSION_MAJOR=1 AF_PACKET HAVE_PACKET_FANOUT LIBCAP_NG LIBNET1.1 HAVE_HTP_URI_NORMALIZE_HOOK HAVE_LIBJANSSON 
SIMD support: none
Atomic intrisics: 1 2 4 8 byte(s)
32-bits, Little-endian architecture
GCC version 4.6.3, C version 199901
compiled with -fstack-protector
compiled with _FORTIFY_SOURCE=2
L1 cache line size (CLS)=64
compiled with LibHTP v0.5.10, linked against LibHTP v0.5.10
Suricata Configuration:
  AF_PACKET support:                       yes
  PF_RING support:                         no
  NFQueue support:                         yes
  IPFW support:                            no
  DAG enabled:                             no
  Napatech enabled:                        no
  Unix socket enabled:                     yes
  Detection enabled:                       yes

  libnss support:                          no
  libnspr support:                         no
  libjansson support:                      yes
  Prelude support:                         no
  PCRE jit:                                no
  libluajit:                               no
  libgeoip:                                no
  Non-bundled htp:                         no
  Old barnyard2 support:                   no
  CUDA enabled:                            no

  Suricatasc install:                      yes

  Unit tests enabled:                      no
  Debug output enabled:                    no
  Debug validation enabled:                no
  Profiling enabled:                       no
  Profiling locks enabled:                 no
  Coccinelle / spatch:                     no

Generic build parameters:
  Installation prefix (--prefix):          /sdcard/suricata/usr
  Configuration directory (--sysconfdir):  /sdcard/suricata/etc/suricata/
  Log directory (--localstatedir) :        /sdcard/suricata/var/log/suricata/

  Host:                                    armv7l-unknown-linux-gnueabi
  GCC binary:                              gcc
  GCC Protect enabled:                     no
  GCC march native enabled:                yes
  GCC Profile enabled:                     no

You can now run Surticata in IDS mode:

1
LD_LIBRARY_PATH=/sdcard/suricata/usr/lib /sdcard/suricata/usr/bin/suricata -c /sdcard/suricata/etc/suricata//suricata.yaml -i ethN

NOTE The intention is to run in IPS mode, however IDS is suitable to complete the integration with logstash and kibana

Get some event data

Configure your SSHD for keyonly authentication, and harden to your preferences and then just expose SSH to the internet for a few hours; I’m not kidding here within ~12 hours I’d logged well over 1K attempted logins enough for suricata to log some ET COMPROMISED Known Compromised or Hostile Host Traffic group events.

Setup ARM Java

1
apt-get install openjdk-7-jre

Logstash

1
2
3
4
5
6
7
8
9
10
11
12
13
14
15
16
17
18
19
20
21
22
23
24
25
26
27
28
29
30
31
32
33
34
35
36
37
38
39
40
41
42
wget https://download.elasticsearch.org/logstash/logstash/logstash-1.4.1.tar.gz
tar -zxvf logstash-1.4.1.tar.gz
cd logstash-1.4.1
mkdir -p etc/conf.d
cat >> etc/conf.d/suricata.conf << EOF
input {
  file { 
    path => ["/sdcard/suricata/var/log/suricata/eve.json"]
    codec =>   json 
    type => "SuricataIDPS-logs"
  }

}

filter {
  if [type] == "SuricataIDPS-logs" {
    date {
      match => [ "timestamp", "ISO8601" ]
    }
  }

  if [src_ip]  {
    geoip {
      source => "src_ip" 
      target => "geoip" 
      database => "/sdcard/logstash-1.4.1/vendor/geoip/GeoLiteCity.dat" 
      add_field => [ "[geoip][coordinates]", "%{[geoip][longitude]}" ]
      add_field => [ "[geoip][coordinates]", "%{[geoip][latitude]}"  ]
    }
    mutate {
      convert => [ "[geoip][coordinates]", "float" ]
    }
  }
}

output {
  elasticsearch {
    embedded => true
  }
}
EOF
bin/logstash -f etc/conf.d/suricata.conf

This will take some time to start up, note that if you want to load in an existing log set, add start_position => "beginning" to the file {} declaration before starting logstash, after the back loading has completed I recomend you to remove this line, as it defaults to “end” and logstash tracks it’s position in the file if you leave this as beginning however it will always start at the beginning of the log and take a long time to startup needlessly

ArgumentError: cannot import class java.lang.reflect.Modifier’ asModifier’

something screwy occurs within jruby

Install oracle java

Download ejre-7u55-fcs-b13-linux-arm-vfp-hflt-client_headless-17_mar_2014.tar.gz from here

“ARMv6/7 Linux - Headless - Client Compiler EABI, VFP, SoftFP ABI, Little Endian1”

1
2
3
4
5
6
7
8
9
10
11
12
13
14
tar -zxvf ejre-7u55-fcs-b13-linux-arm-vfp-sflt-client_headless-17_mar_2014.tar.gz
update-alternatives --install "/usr/bin/java" "java" "/path/to/ejre1.7.0_55/bin/java" 1
update-alternatives --config java
...
There are 2 choices for the alternative java (providing /usr/bin/java).

  Selection    Path                                            Priority   Status
------------------------------------------------------------
* 0            /usr/lib/jvm/java-7-openjdk-armel/jre/bin/java   1043      auto mode
  1            /path/to/ejre1.7.0_55/bin/java                    1         manual mode
  2            /usr/lib/jvm/java-7-openjdk-armel/jre/bin/java   1043      manual mode

Press enter to keep the current choice[*], or type selection number: 
 

Select 1 or whatever index you are shown

Kibana

Kibana is really just a web interface, so download it and install your preffered webserver to run it from nGinx / Apache / Lighthttpd etc …

1
2
cd /path/to/kibana/apps/dashboards/
curl -o suricata2.json https://gist.githubusercontent.com/regit/8849943/raw/15f1626090d7bb0d75bca33807cfaa4199b767b4/Suricata%20dashboard

In your browser now go to https://your_device/path/to/kibana/#/dashboard/file/suricata2.json

Heartbleed - CVE-2014-0160

Heartbleed, sounds like a bad B-Movie title / title for some cheesy pop song doesn’t it?

If only that were the case, as I have covered in my blog post on mysqlperformanceblog.com heartbleed affects OpenSSL versions 1.0.1 through 1.0.1f

I’ve spent the last 2 days working 15hrs plus on this, and this is during some nasty Jet Lag courtesy of my return trip from Percona Live 2014, as the code keeps being pulled down for some reason I have mirrored some effective P.o.C code at github NOTE: This is not my own code I am only mirroring it, use at your own risk etc etc …

I encourage you to both read my blog post and my colleague Ernie’s blog post on the matter.

the TL;DR

  1. 0.9.8 and 1.0.0 versions ARE NOT VULNERABLE
  2. 1.0.1 -> 1.0.1f ARE VULNERABLE
  3. some distros are backporting to fix into their 1.0.1e (Redhat, ubuntu, debian etc …)
  4. check changelogs of packages for CVE-2014-0160 fixes
  5. you MUST rotate keys and certificates and assume ALL user credentials have been compromised

In my own testing using the POC code I found the following.

  1. I could not dump the SSL keys from memory (I may have just been unlucky here, some sources are claiming they have been able to do this).
  2. I could dump ANY content which had a some point been “in flight” e.g. user login forms and servers responses (usernames + passwords + session cookies etc).
  3. I could ONLY dump the memory of the process using TLS (some sources claimed to be able to walk the entire server memory, I found this to not be the case).

This blog post may not be my usual deep dive, however given the work being done and the links to blog posts on MPB this shold be enough information for you the reader to go on in the interim.

UPDATE: this video provides a great description on the vulnerability in detail.